Crochet Leprechaun Gnome

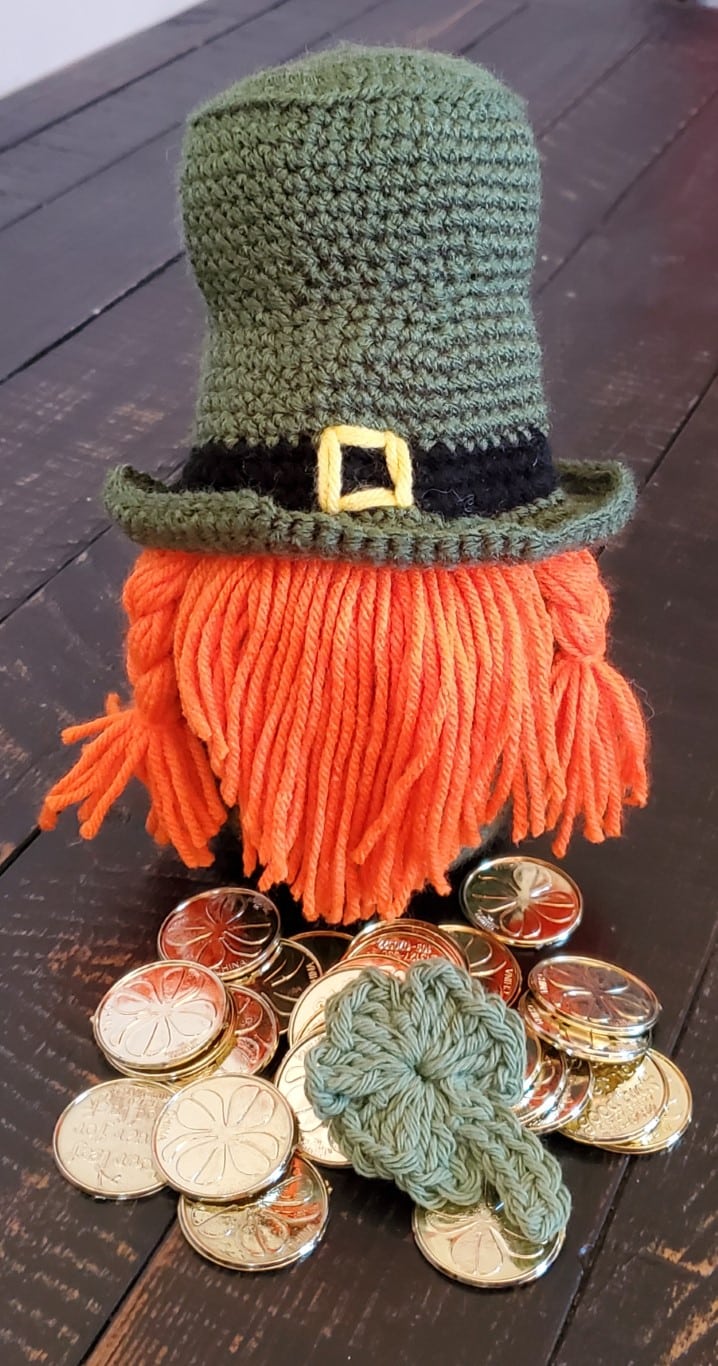
Check out this adorable little Crochet Leprechaun Gnome! He’s the perfect accessory to guard your home, or his pot of gold, on St. Patrick’s Day! Check out the free pattern below! Or you can purchase an Ad-Free PDF.
Looking to make accessories for your crochet leprechaun gnome? Make him his own a pot of gold, with this crochet cauldron pattern! Just fill it with coins…or chocolate!
Skill Level
Advanced Beginner
Materials Needed
- Worsted Weight yarn in the following colors
- Green
- Yellow
- Orange
- Black
- Polyfil
- Size 3.5mm crochet hook
- Yarn Needle for sewing
- Scissors
Stitches and Abbreviations
- Ch – Chain
- SC – Single Crochet
- MC – Magic Circle (Ch 2 can be used if you prefer)
- Sl St – Slip Stitch
- Inc – Increase – Work 2 SC into one stitch
- Dec – Decrease – Work 1 SC into two stitches (reduces two stitches into one)
- SC BLO – Single Crochet into Back Loop Only
- SC FLO – Single Crochet into Front Loop Only
- Inc BLO – Work 2 SC into the Back Loop Only of one stitch
Written Instructions
Main Body
In Green
Begin with a MC
Round 1: SC 6 into MC. Sl St to first stitch to close round. Ch 1 (6)
Round 2: Inc into each stitch around. Sl St to first stitch to close round. Ch 1 (12)
Round 3: *SC, Inc* into each stitch around. Sl St to first stitch to close round. Ch 1 (18)
Round 4: *2 SC, Inc* into each stitch around. Sl St to first stitch to close round. Ch 1 (24)
Round 5: *3 SC, Inc* into each stitch around. Sl St to first stitch to close round. Ch 1 (30)
Round 6: *4 SC, Inc* into each stitch around. Sl St to first stitch to close round. Ch 1 (36)
Round 7: *5 SC, Inc* into each stitch around. Sl St to first stitch to close round. Ch 1 (42)
Round 8: *6 SC, Inc* into each stitch around. Sl St to first stitch to close round. Ch 1 (48)
Round 9: SC BLO into each stitch around. Sl St to first stitch to close round. Ch 1 (48)
This step creates a flat bottom for the gnome to stand on
Round 10-24: SC into each stitch around. Sl St to first stitch to close round. Ch 1 (48)
Round 25: *6 SC, Dec* into each stitch around. Sl St to first stitch to close round. Ch 1 (42)
Round 26: *5 SC, Dec* into each stitch around. Sl St to first stitch to close round. Ch 1 (36)
Round 27: *4 SC, Dec* into each stitch around. Sl St to first stitch to close round. Ch 1 (30)
Round 28: *3 SC, Dec* into each stitch around. Sl St to first stitch to close round. Ch 1 (24)
Round 29: *2 SC, Dec* into each stitch around. Sl St to first stitch to close round. Ch 1 (18)
Stuff with polyfil / stuffing
Round 30: *SC, Dec* into each stitch around. Sl St to first stitch to close round. Ch 1 (12)
Round 31: Dec into each stitch around. Sl St to first stitch to close round. Ch 1 (6)
Fasten Off, sew any remaining opening closed. It doesn’t need to be pretty, the hat and hair will cover this.

Crochet Leprechaun Hat
In Green
Begin with a MC
Round 1: SC 6 into MC. Sl St to first stitch to close round. Ch 1 (6)
Round 2: Inc into each stitch around. Sl St to first stitch to close round. Ch 1 (12)
Round 3: *SC, Inc* into each stitch around. Sl St to first stitch to close round. Ch 1 (18)
Round 4: *2 SC, Inc* into each stitch around. Sl St to first stitch to close round. Ch 1 (24)
Round 5: *3 SC, Inc* into each stitch around. Sl St to first stitch to close round. Ch 1 (30)
Round 6: *4 SC, Inc* into each stitch around. Sl St to first stitch to close round. Ch 1 (36)
Round 7: *5 SC, Inc* into each stitch around. Sl St to first stitch to close round. Ch 1 (42)
Round 8: *6 SC, Inc* into each stitch around. Sl St to first stitch to close round. Ch 1 (48)
Round 9: SC BLO into each stitch around. Sl St to first stitch to close round. Ch 1 (48)
This step creates a flat top for the Leprechaun’s Top Hat
Round 10-14: SC into each stitch around. Sl St to first stitch to close round. Ch 1 (48)
Round 15: *6 SC, Dec* into each stitch around. Sl St to first stitch to close round. Ch 1 (42)
Round 16: *5 SC, Dec* into each stitch around. Sl St to first stitch to close round. Ch 1 (36)
Round 17: *4 SC, Dec* into each stitch around. Sl St to first stitch to close round. Ch 1 (30)
Round 18: *4 SC, Inc* into each stitch around. Sl St to first stitch to close round. Ch 1 (36)
Round 19: *5 SC, Inc* into each stitch around. Sl St to first stitch to close round. Ch 1 (42)
Round 20: *6 SC, Inc* into each stitch around. Sl St to first stitch to close round. Ch 1 (48)
Round 21-23: SC into each stitch around. Sl St to first stitch to close round. Ch 1 (48)
Switch to Black Yarn – Creates Band/Belt for Hat
Round 24-26: SC into each stitch around. Sl St to first stitch to close round. Ch 1 (48)
Switch to Green Yarn
Round 27: *7 SC BLO, Inc BLO* around. Sl St to first stitch to close round. Ch 1 (54)
This creates the flat brim of the hat
Round 28: *8 SC, Inc* into each stitch around. Sl St to first stitch to close round. Ch 1 (60)
Round 29: *9 SC, Inc* into each stitch around. Sl St to first stitch to close round. Ch 1 (66)
Round 30: *10 SC, Inc* into each stitch around. Sl St to first stitch to close round. Ch 1 (72)
Round 31: *11 SC, Inc* into each stitch around. Sl St to first stitch to close round. Ch 1 (78)
Fasten Off, Weave in ends.
Using Yellow Yarn, stitch a buckle/box onto the black band/belt of the hat. Fasten off, and stuff hat ¾ full with polyfil/stuffing

Assembly
Cut orange yarn into 12 to 14 inch pieces, it’s better to make them too long than too short, as they can always be trimmed later.
Attach orange to body of gnome in desired fashion. I worked around the head, starting about 6 rounds out from the center, looping the yarn around the post of the stitches as shown in the pictures. I then did two more rounds, moving in towards the center, all the way around. There is no need to completely fill in his head. Poor little guy can have a bald spot, as the hat will cover it. It will make it easier to stitch on.
I divided the hair into 4 equal sections. Two connected sections will be the beard, so make sure you’ve got the beard section facing the direction you want in front. Trim into shape as desired.
Braid the other two quartered sections of yarn/hair. Tie off with a piece of yarn.


Attach the hat to the top of the body by sewing. I used black yarn and stitched around through the black band/belt of the hat to attach to the body.
If desired, attach a bead to the front, under the brim of the hat, on top of the beard, for a nose.


I hope you enjoyed making your Crochet Leprechaun Gnome! Don’t forget to check me out on Ravelry and Facebook!
Copyright 2023 Emerald Cherub. Do not sell, share or modify this content. You may sell projects made from this pattern, please link back to the original pattern. The images and content contained in this pattern are copyright protected. To obtain permission for commercial use, contact Emerald Cherub.


