Crochet Charts and Written Patterns
Let’s say you want to make a project, any project. It could be a hat, blanket, cardigan or anything you’re interested in putting together. The first thing most of us do is hit the internet to search for a pattern. So what are you going to find when you find that pattern? There are two main ways to write the directions for a crochet project. Crochet charts and written patterns. They are both completely different ways to get to the same result, a finished crochet project. Which one you use depends entirely on preference, both yours and the designer’s.
Why Are There Different Ways to Write a Pattern?
So why two ways? It’s not really as complex as you may think. Some people are visual and some prefer to see the steps written out. It’s the same reason I put step by step pictures in all of my tutorials. Sometimes, you need to SEE things in order to understand. And sometimes, you just want to have someone spell out to you what the next step is.
Written Patterns
Written Patterns are step by step directions. Each step is typically written by row, using abbreviations. They are written similar to a recipe. You start with a written description of what you need to make the project. Usually the designer will tell you how much of each color yarn you need, the size hook to use, and any accessories or embellishments required for the project. Following the materials list, the designer will start by indicating how many chains are needed to make the foundation row. Next, they will describe in words and abbreviations how to make the project, by row. An example of this is below:
Ch 11
Row 1: SC in second ch from hook, SC in ea Ch across (10)
Ch 1, turn
Row 2-10: SC in each ch across (10), Ch 1, turn.
Fasten Off
Weave in ends.
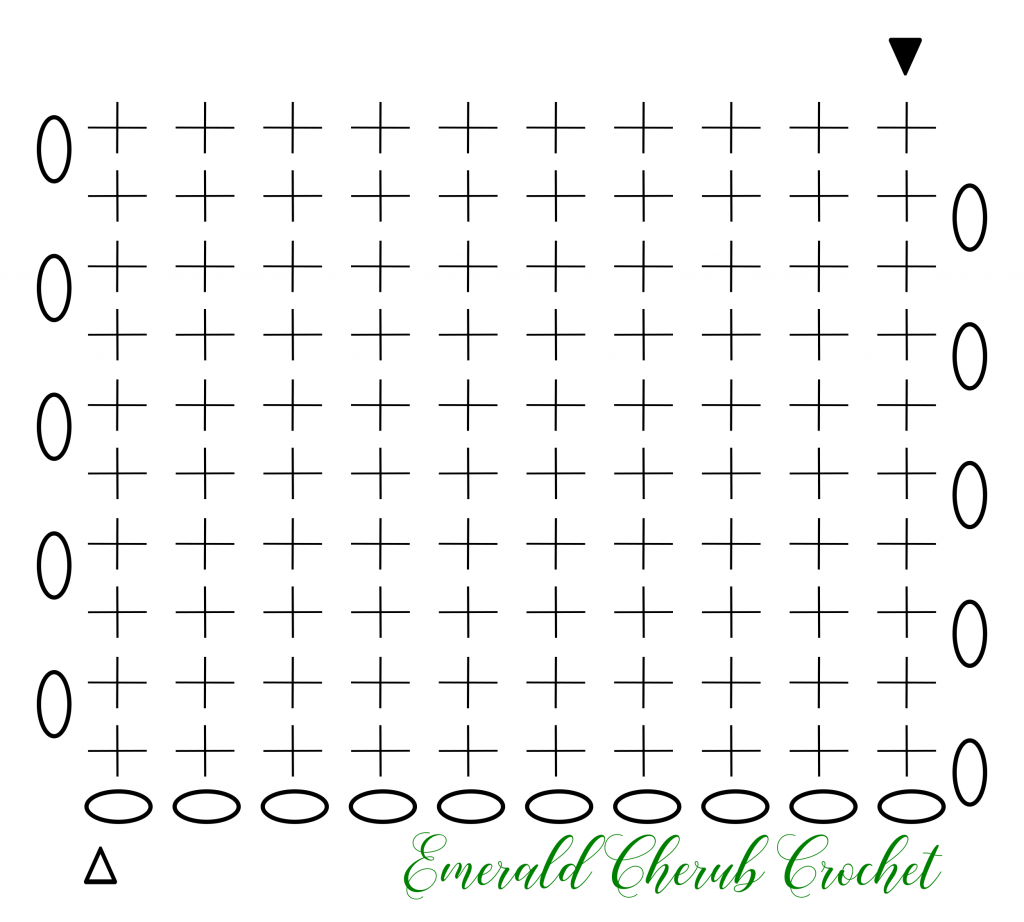
The above is a written pattern for a 10 stitch, single crochet square. The left side indicates what row you are working on, the center tells the stitches for that row, and the number in parenthesis on the right is the number of stitches you will be making in that row.
Crochet Charts as Patterns
Charts are a pictorial diagram of the entire project. Using symbols, the pattern is physically drawn out before you. You just need to know the symbols in order to make your project. Below is a diagram showing the symbols used in crochet charts.

The visual representation can make creating projects easier for some people. Another great benefit to charts, as opposed to written instructions, is that you don’t need to worry about the language of the original designer. Symbols cross over language barriers without confusion.
The downside is that we work crochet from left to right, always. This means that when you are working a project that needs to be turned, for instance a square washcloth, you will read the chart from left to right for the first row, and then right to left for the second row. It can be a bit difficult for some people to get used to. A good way to help keep yourself on track is to mark your chart with the direction you’re working the row.
Below is a chart representing the 10 stitch single crochet square pattern written above. Notice the start indicates you chain 11. The first single crochet is shown in the second stitch from the hook, and you can see there is a single crochet in each stitch across.
Crochet Charts and Written Patterns
Now that you know the difference between crochet charts and written patterns, which do you prefer? Crochet Charts or Written Patterns? Tell me which one and why below!