
Basic Crochet Coaster Tutorial and Pattern
The third project in the single crochet tutorial series is Basic Crochet Coasters. Some of you may be rolling your eyes and thinking “Coasters? Really?” But yes! They come in handy, they’re quick to work up, and they can be tossed in your washing machine if you spill something on them. Plus, we are going to be adding ANOTHER skill to your arsenal! I am going to teach you how to add an optional border to your coasters!
Besides being useful, quick projects to work up, they also make great gifts. This is a great beginner project to help you work on tension and maintaining the shape of your project. So let’s get to it!
If you are a seasoned hooker looking for the written pattern, it can be found at the bottom of this post.
What You Need
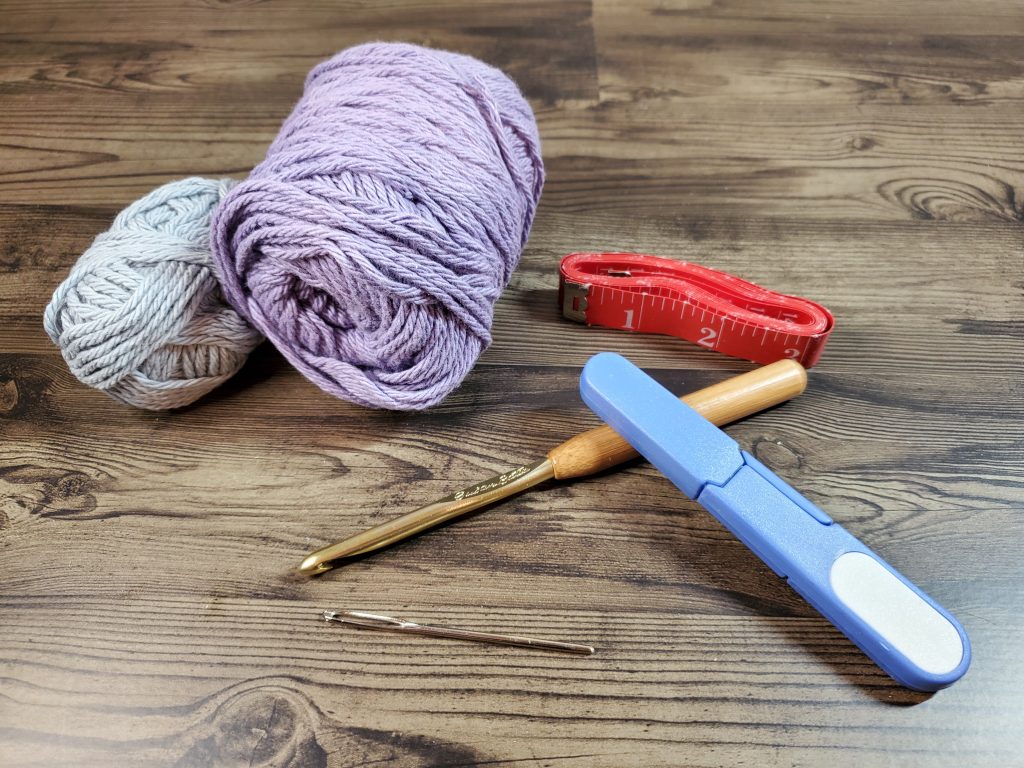
- 1 ball cotton yarn, medium weight. I used Peaches & Creme.
- 6mm crochet hook
- Yarn needle.
- Optional, a second color of cotton yarn for the border
- Tape Measure, for measuring gauge
Pro Tip: I advise against using black if you are a beginner. Black is much more difficult to see than other colors and can be difficult to work with.
Beginning your Basic Crochet Coaster
You’re going to start your basic crochet coasters the same way as the last few projects we have made. Start with your slip stitch, and tighten it around your hook.
Next, make a chain of 12. (your chain should be around 4.5″ long)
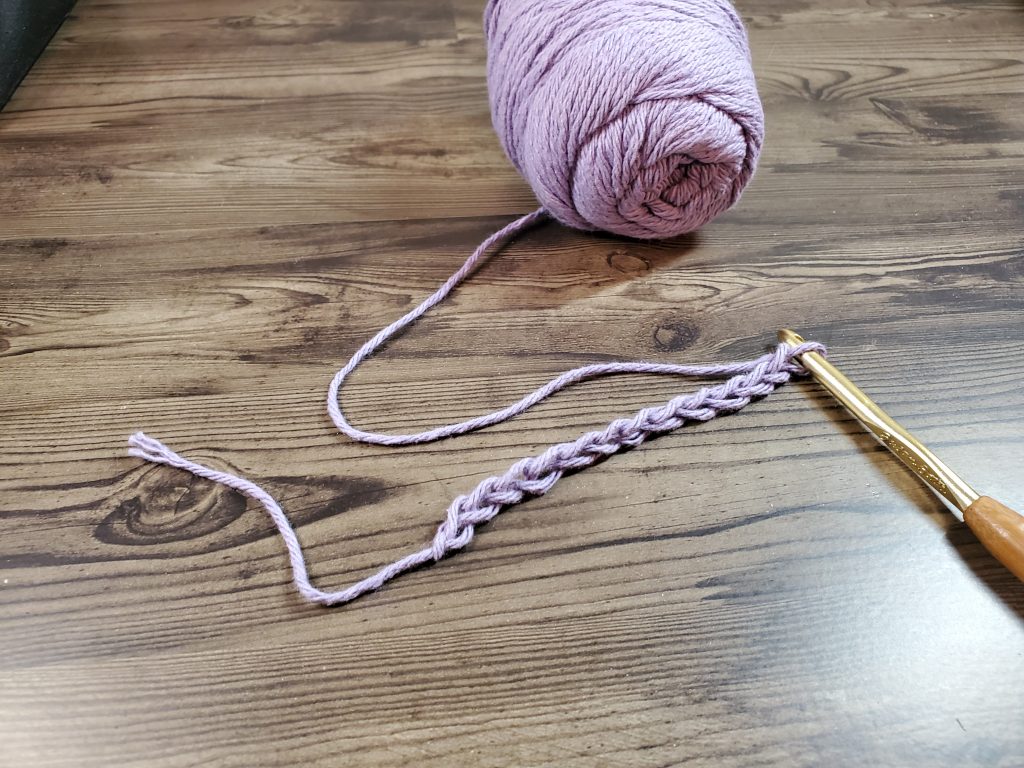
Now, make your first single crochet into the 2nd chain from the hook. Do this by inserting your hook into the single loop on the back side of your chain. Next you will “pull up a loop” by grabbing the working yarn with your hook and pulling it through the loop you inserted your hook into. You will have 2 loops on your hook. Now, yarn over with the working yarn, and pull through both loops on your hook.
Repeat this process down the chain until you reach the end. You will have done 11 single crochet stitches.


Once you have your 11 single crochet stitches, you will need to bring your yarn up to do another row. Do this by creating a turning chain. For single crochet, you will make one chain stitch, and turn your work.
Now, start your row by inserting your hook into the first stitch, this time, under both loops which create the top of the single crochet of the previous row. Pull up a loop, yarn over, and pull through both loops. Do this in each stitch of the row. You will have 11 stitches in this row.


Repeat the process until you have 12 rows of 11. Single crochet 11, chain 1, turn. When you get to the end of the 12th row, fasten off your yarn, and weave in both ends.


You can leave your project like this, or you can choose to add a border. If you choose to add a border, read on to learn how!
Adding a Border to Your Basic Crochet Coaster
If you are adding a border to your Basic Crochet Coaster, you can do so with either a contrasting/complementing color of yarn, or with the same yarn used for the main color of your fabric. The choice is up to you. Both options are perfectly acceptable (as is leaving your coaster without a border!)
The first step to adding your border is to connect your yarn to your project. To do this, you are going to need to make a slip knot, and tighten the loop around your hook.

Next, find a stitch in the middle of your last row to work into. It doesn’t matter which one, as long as it is not on the corner.
Pro Tip: Starting your border in the middle, rather than a corner, makes it easier to close and fasten off.
Insert your hook into the stitch, under both loops, just like you did with your single crochet rows. Now, you are going to make your single crochet. Pull up a loop, yarn over, and pull through both loops on your hook. Do the same in the next few stitches, until you get to the corner.


Creating a Corner in a Single Crochet Border
Corners are a bit tricky. In order for your border to lay flat, you need to increase the number of stitches in the corners. If you do not increase the number of stitches in the corner, your border will curl, and your coaster (or other project), will not lay flat as intended. So, here is how you make a corner for your Basic Crochet Coaster.
Insert your hook into the last stitch of the row, and make one single crochet. This is the last single crochet of the top edge of your coaster.


Next, insert your hook into the same stitch, again. Make another single crochet. This stitch is the new corner of your coaster.
Insert your hook into the same stitch one last time. Make a third single crochet. This single crochet is the first single crochet of the edge side of the coaster.
You will have now moved your yarn around the edge of your project and to the edge, to continue your border down the side.


Working the Edge Side of the Crochet Border
It is a bit more difficult to work into the edge side of a project than it is to work into the top or bottom, because you are working into the side of the stitches, rather than into the 2 loops which form the top edges of the stitches. For single crochet projects, you need to work 1 single crochet into each row of single crochet. For this project, you will have a total of 12 single crochet on the side of your project, because we made 12 rows. Remember, we have already made the first stitch of this row in the corner, and our last stitch will be in the corner at the end of this edge. Insert your hook into the side of each row, and make a single crochet all the way down the edge.


When you get to the last stitch, you need to make your corner. Do this the same way we did the last corner, by making three (3) single crochet stitches into the last stitch, and continue your border down the bottom of the coaster. Continue this until you have made a single crochet in each stitch around, with an extra stitch in each corner. The total count of stitches you are using to make your border should be 50 (11 across the top and bottom, plus 12 rows on each side, and your extra stitch in each corner, make 11+11+22+22+4=50).

Closing Gap with Slip Stitch
When you complete the last stitch, you will notice there is a gap between the first stitch and the last stitch. To close this gap, we are going to connect these stitches with a stitch called the slip stitch. A slip stitch is essentially a basic slip knot done within a project.
To make a Slip Stitch, insert your hook into the first stitch, and pull up a loop. Rather than yarn over here, like you would in a single crochet, continue to pull the loop through the bottom loop on your hook. Your Slip Stitch is now complete, and there is no longer a gap between the first and last stitches of your border.


Fasten off your yarn, and weave in your ends. Your project is now complete and ready for use! If you are making a gift, don’t forget that coasters typically come in sets of 4. Mix and match colors for fun sets, and wrap them with ribbon!


Because your coasters are made of cotton, they are absorbent and are easily washed. Follow the directions on your yarn label for washing.
Basic Crochet Coaster – Written Pattern
What You Need
- 1 ball cotton yarn, medium weight. I used Peaches & Creme.
- 6mm crochet hook
- Yarn needle.
- Optional, a second color of cotton yarn for the border
Instructions
In Main Color
Chain 12
Row 1: SC in 2nd Ch from hook and each Ch across (11)
Ch 1, turn
Row 2-12: SC in each chain across (11)
Fasten off, weave in ends
In Border Color:
Fasten On in middle of last row.
SC to corner
3 SC in corner
SC down side
3 SC in corner
SC down bottom edge
3 SC in corner
SC down side
3 SC in corner
SC to last available stitch
Slst to first stitch
Fasten off, weave in ends
So, how did you do? Tell me below!
Follow me on Facebook for more updates, or join my Facebook Group!


Easy to understand directions. Great to follow..nice for the beginner.
Thank you very much! I really appreciate hearing that!